How to Assemble the Last Stand Rolling Orff Cart (updated)
By: Margaret Swain - 1/12/2021
|
1. The Last Stand rolling Orff carts are designed to hold xylophones and metallophones of all brands and sizes.
For soprano and alto instruments, choose Model SA1. For Studio 49 bass instruments or any compact style bass, choose Model BA1. For taller bass instruments, such as the Sonor, Lyons, Pulse, or MEG, choose Model BA2. The stand shown in this set of instructions is a Last Stand Model BA2. These instructions can also be used for the SA1 and BA1. The only difference is that the end units for the SA1 and BA1 are taller than the BA2.
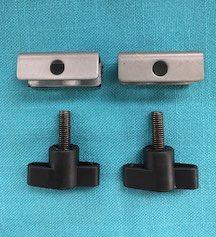
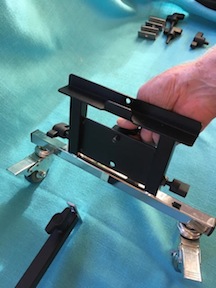
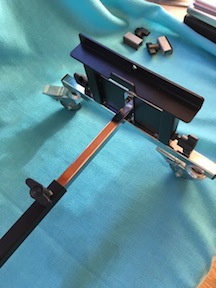
Here are the parts you will find when you open the box.
 You should have:
 - 2 adjustable-height end units, with casters, - 2 adjustable-height end units, with casters,
- 1 adjustable-length bar
- 2 silver push plates with rubber facings
- 2 wing screws, long
- 4 wing screws, short
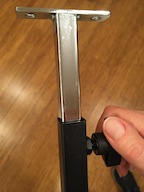
Before you begin, tighten down the 2 wing screws that are already attached to each
end unit. Pull out the silver length-adjustable bar a couple of inches and tighten down its single wing screw.
This will prevent the telescoping sections from coming apart while you work.
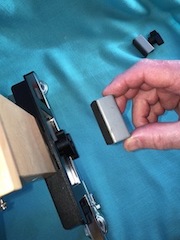
_________________________________________________________________________ 2. Set aside the 2 long wing screws and the 2 silver push plates. We wont
need those until later. 2. Set aside the 2 long wing screws and the 2 silver push plates. We wont
need those until later.
_________________________________________________________________________
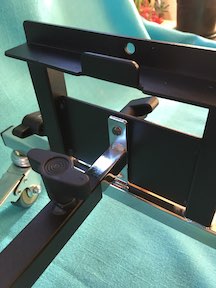
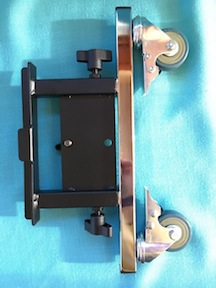 3. Position one of the end units so that it looks like this. Note that the bent metal tab on the trough is facing up toward the ceiling.
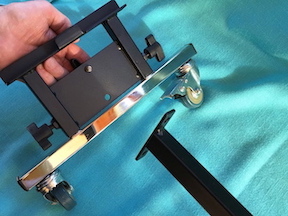
From the underside, push one of the short wing screws through the top hole as shown
below. Bring the black end of the adjustable-length bar near to dock with the 2
holes on the end unit. It will work best if the single wing screw on the bar is facing up.
Partially tighten the first short wing screw as shown below. Note the bent tab is
on the same side as the adjustable-length bar.
3. Position one of the end units so that it looks like this. Note that the bent metal tab on the trough is facing up toward the ceiling.
From the underside, push one of the short wing screws through the top hole as shown
below. Bring the black end of the adjustable-length bar near to dock with the 2
holes on the end unit. It will work best if the single wing screw on the bar is facing up.
Partially tighten the first short wing screw as shown below. Note the bent tab is
on the same side as the adjustable-length bar.
  _________________________________________________________________________ _________________________________________________________________________
 4.
Install the second short wing screw through the bottom hole as shown below. Do NOT
fully tighten yet. 4.
Install the second short wing screw through the bottom hole as shown below. Do NOT
fully tighten yet.
_________________________________________________________________________
5. Now look at the other (right side) end of the adjustable-length bar.
Position the other end unit on the right side, making sure the bent metal tab is facing toward the adjustable-length bar. Install one of the short wing screws as you did on the left side. Partially tighten the short wing screw on top, and then add the remaining short wing
screw to the bottom hole.
  _________________________________________________________________________ _________________________________________________________________________
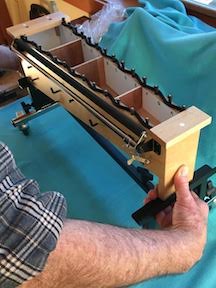
 6. With all four casters on a level surface, tighten down the four short wing
screws. Next, loosen the wing screw on the adjustable-length bar and expand the stand to
approximately fit your instrument. Leave the screw on the bar loose for now. We will tighten it later.
_________________________________________________________________________
7. The first photo below shows that we have not yet added the long wing screws and push plates. They are resting in the background. Resist the urge to add them now.
Remove the tone bars from your instrument and place it on the stand. Be sure the
instrument is sitting down squarely in the trough, and is centered at both ends. Each trough is bounded by a
bent metal tab and the L-shaped bend in the black metal. Once the instrument is
sitting down squarely and is centered, grab the stand at both ends and pull it to its
maximum length. Now tighten down the wing screw on the adjustable length bar. 6. With all four casters on a level surface, tighten down the four short wing
screws. Next, loosen the wing screw on the adjustable-length bar and expand the stand to
approximately fit your instrument. Leave the screw on the bar loose for now. We will tighten it later.
_________________________________________________________________________
7. The first photo below shows that we have not yet added the long wing screws and push plates. They are resting in the background. Resist the urge to add them now.
Remove the tone bars from your instrument and place it on the stand. Be sure the
instrument is sitting down squarely in the trough, and is centered at both ends. Each trough is bounded by a
bent metal tab and the L-shaped bend in the black metal. Once the instrument is
sitting down squarely and is centered, grab the stand at both ends and pull it to its
maximum length. Now tighten down the wing screw on the adjustable length bar.
  _________________________________________________________________________
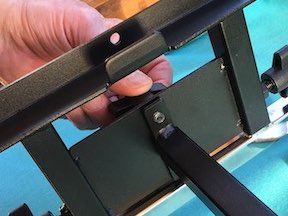
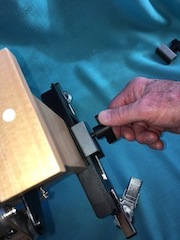
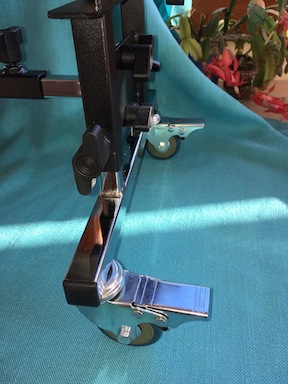
8. Remember the push plates and long wing screws we set aside earlier? Now it is time to add them. Add each push plate with its rubber side facing the instrument. If for any reason the rubber material has slipped off or appears to be stuck onto the wrong side of the push plate, simply peel it off and reposition it correctly.
Align the holes.Now you can add a long wing screw to each push plate, and tighten it down. The push plate
will move toward the instrument, holding it snugly in place. If you have not yet tightened the wing screw on the length-adjustable bar, tighten it now. _________________________________________________________________________
8. Remember the push plates and long wing screws we set aside earlier? Now it is time to add them. Add each push plate with its rubber side facing the instrument. If for any reason the rubber material has slipped off or appears to be stuck onto the wrong side of the push plate, simply peel it off and reposition it correctly.
Align the holes.Now you can add a long wing screw to each push plate, and tighten it down. The push plate
will move toward the instrument, holding it snugly in place. If you have not yet tightened the wing screw on the length-adjustable bar, tighten it now.
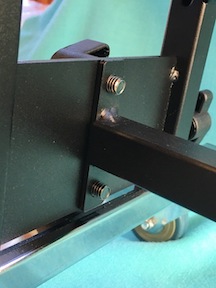
 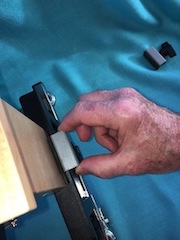  Here is another view of the push plate installation. Here is another view of the push plate installation. 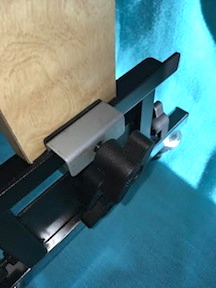 _________________________________________________________________________
9. Now you are ready to adjust the height of your stand. If you have 2
people doing this together, one person can loosen the wing screws on the side of the
end units (4 screws total) and hold the instrument up to the desired height, while
the 2nd person tightens down these 4 screws. But if you are alone, or need to maintain distance from others due to COVID, follow this trick for easy
1-person height adjustment.
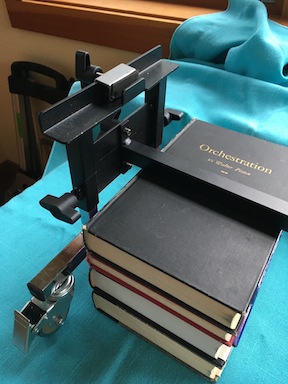
First prop up one end of the stand on a stack of books, or a box, or any other item
that is the correct height. We have taken the instrument off the stand for the purpose of photographic clarity, but it also works to leave the instrument on the stand while adjusting the height. _________________________________________________________________________
9. Now you are ready to adjust the height of your stand. If you have 2
people doing this together, one person can loosen the wing screws on the side of the
end units (4 screws total) and hold the instrument up to the desired height, while
the 2nd person tightens down these 4 screws. But if you are alone, or need to maintain distance from others due to COVID, follow this trick for easy
1-person height adjustment.
First prop up one end of the stand on a stack of books, or a box, or any other item
that is the correct height. We have taken the instrument off the stand for the purpose of photographic clarity, but it also works to leave the instrument on the stand while adjusting the height. 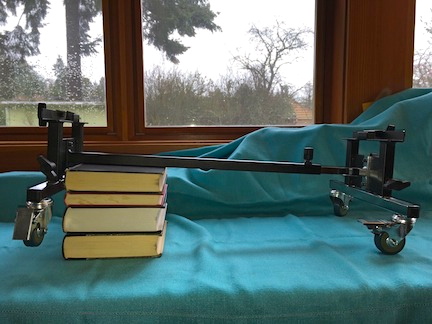 The length-adjustable bar will rest on the temporary
propping platform. The casters on that side will be off of the floor or table. Now loosen the 2 wing screws on the sides of the end unit, and let the casters drop
down to the table or floor. Tighten the wing screws in place.
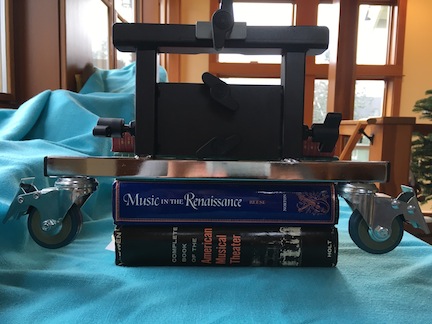
Because the stand in the photos is a Model BA2, meant for tall bass instruments, not much height adjustment is needed. But if you are assembling a Model SA1 stand, meant for soprano and alto instruments, your options for height adjustment will be greater. The length-adjustable bar will rest on the temporary
propping platform. The casters on that side will be off of the floor or table. Now loosen the 2 wing screws on the sides of the end unit, and let the casters drop
down to the table or floor. Tighten the wing screws in place.
Because the stand in the photos is a Model BA2, meant for tall bass instruments, not much height adjustment is needed. But if you are assembling a Model SA1 stand, meant for soprano and alto instruments, your options for height adjustment will be greater.
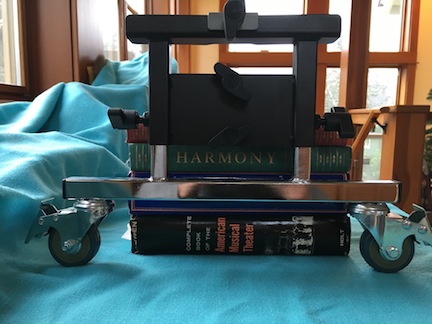
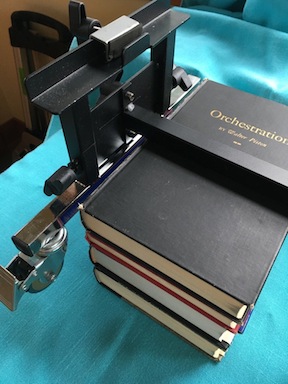  Here is an end view of the same process.Casters up. Here is an end view of the same process.Casters up.
Casters down.
 Next move that same stack of books, or same box, or same other item to the
other end of the stand.
You must use the same prop on both ends of the instrument.
Loosen the screws and let the casters drop down. Tighten both wing screws. _________________________________________________________________________
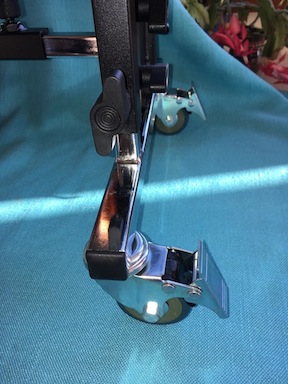
10.
Casters can be locked by pushing down on the locking levers.
Or they can be unlocked by pulling up. Next move that same stack of books, or same box, or same other item to the
other end of the stand.
You must use the same prop on both ends of the instrument.
Loosen the screws and let the casters drop down. Tighten both wing screws. _________________________________________________________________________
10.
Casters can be locked by pushing down on the locking levers.
Or they can be unlocked by pulling up.
  The safest way to move your instruments around while mounted on a rolling stand, is
to unlock all the casters, and either pull or push from the ONE END of the instrument NOT FROM THE SIDE. Pushing from the END is like driving a car. If one of the casters stops rolling for any reason, the instrument will stay on the stand, and the stand will not tip
over. Pushing from the SIDE can be RISKY.
When an instrument is mounted on a stand,
the center of gravity of the combined unit is HIGH, thus you want the most stable
configuration for moving it. If you do have to go over a bump, like the threshhold
of a door, or other impediment, PULL the instrument through from one END. DO NOT PUSH.
This will give you more control. As an instrument repair technician, Ive
had to repair a few instruments that fell off their stands, or tipped over, and quite of bit of
damage can occur when this happens.
The most successful instrument storage I have seen, when instruments are mounted on
stands, is where Parking Spots have been marked out on the floor or on the wall,
for students to push the small end of the instrument toward the wall. This is just
like head-in parking for cars in a parking lot.
Enjoy your new instrument stands!
The safest way to move your instruments around while mounted on a rolling stand, is
to unlock all the casters, and either pull or push from the ONE END of the instrument NOT FROM THE SIDE. Pushing from the END is like driving a car. If one of the casters stops rolling for any reason, the instrument will stay on the stand, and the stand will not tip
over. Pushing from the SIDE can be RISKY.
When an instrument is mounted on a stand,
the center of gravity of the combined unit is HIGH, thus you want the most stable
configuration for moving it. If you do have to go over a bump, like the threshhold
of a door, or other impediment, PULL the instrument through from one END. DO NOT PUSH.
This will give you more control. As an instrument repair technician, Ive
had to repair a few instruments that fell off their stands, or tipped over, and quite of bit of
damage can occur when this happens.
The most successful instrument storage I have seen, when instruments are mounted on
stands, is where Parking Spots have been marked out on the floor or on the wall,
for students to push the small end of the instrument toward the wall. This is just
like head-in parking for cars in a parking lot.
Enjoy your new instrument stands!
|
 |
|
 Margaret Swain
I enjoy working to connect teachers to quality books and instruments for music and dance education. I hope you find my blog useful and interesting.
|
|
|
|
|
Orff Instrument Repair and Assembly (more)
Courses and Classes for Teachers (more)
Mallets (more)
Product Spotlights (more)
Orff Instruments (more)
|

|
|


